
Tagged: Lesson
A collection of posts for NQTs.

Dylan Wiliam
I wanted to write a definitive post for NQTs but was struck by how many useful posts already exist. Instead of repeating what others have already written, this post will serve to index some great advice from some remarkable people. The is predominately for new teachers but will also serve as a timely reminder to all teachers at any stage in their careers.
- It is completely normal | Sue Cowley | @Sue_Cowley | Blog
- ‘Crowd wisdom for NQTs’ iBook | Rachel Jones | @rlj1981 | Blog
- A letter to my NQT self | Chris Hildrew | @chrishildrew | Blog
- Contemporary educational ideas all my staff should know about | Tom Sherrington | @headguruteacher | Blog
- The pedagogy postcards series | Tom Sherrington | @headguruteacher | Blog
- This much I know about why all of us must improve our teaching | John Tomsett | @JohnTomsett | Blog
- Back to school series | David Didau | @LearningSpy | Blog
- Some quick tips for NQTs and Trainees | @OldAndrewUK | Blog
- What I wish I knew then | Mark Anderson | @ICTEvangelist | Blog
#neverstoplearning
#TMNSL 20/03/2014 – Workshop resources: Stop doing I.T. wrong!
Stop doing I.T. wrong! by David Morgan (@lessonhacker)

Stop doing I.T. wrong by David Morgan.
Workshop summary.
Digital learning is not something to be scared of or to be worried about.
It’s just learning.
No one called it ‘Pen based learning’ when we moved away from slate tablets, but I’m sure there were a few people reluctant to change their ways, or that didn’t quite ‘get’ the point of pens. In any case, digital learning is here to stay and should be a part of every lesson in some form, if only because it saves you time!

@lessonhacker
If you’re interested in finding out more then head to my blog [http://www.lessonhacker.com/] or read my book, which coincidentally has the same title as my workshop [http://www.stopgettingitwrong.com/] .
Buy David’s book – Stop doing I.T. wrong!
@LessonHacker on Twitter.
#neverstoplearning

#NeverStopLearning by @DavidJesus
‘Quick wins’ #16 – SLANT – Building habits in the classroom.
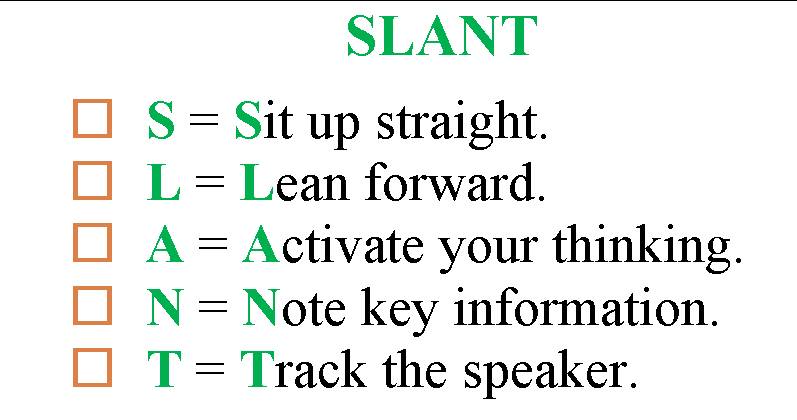
Image via http://olms1.cte.jhu.edu/29618
Why? I’ve struggled to get 100% attention from students 100% of the time. Quite often when I instruct students I’ll use the “3,2,12 technique to get students attention, which works well. But I then struggle to retain attention. This is made especially difficult when teaching in a Computing room – the lure of the computer screen can be too much for students. A typical instruction will have to be halted within seconds to address students who’s eyes have wondered back to their computer screen.
Possible solution. I needed a routine to retain student attention. I started my research by looking at Doug Lemov’s excellent collection of videos for his ‘Teach like a Champion’ book. I came across the video below.
It was during the video I saw a poster on the wall of one of the classrooms with the word ‘SLANT.’ Further investigation led me to discover the meaning of this term. SLANT is a strategy used to get students to pay attention not only when the teacher is talking but also when a student contributes to a discussion. An overview of the strategy can be found below…
Sit up: What is the right posture to sit in the classroom? Is it to rest your head on your hands, sit slouched in your seat or put your head down on the table? These are all positions that will put students to sleep. In order to develop attentive listeners, it is essential to encourage students to sit up straight with their back against the seat, feet placed firmly on the ground and hands on the table. This is the optimal position to ensure good learning and processing of information.
Lean forward: Another position that is critical to promote active listening is leaning forward. Students should be taught to lean forward during a lesson. It may also help teachers understand the interest level of the class and fine tune their presentation to make it more interesting for the students.
Ask and answer questions: This component can liven up the classroom and encourage students to be active in their learning process. Encourage them to clarify their doubts, answer questions, and discuss or debate on ideas. These question and answer sessions can help activate their thinking, encourage critical analysis of the content and strengthen their understanding of the lesson.
Nod your head: Nodding one’s head is a form of nonverbal communication to indicate that the lesson has been understood. When a teacher observes a student nodding his/her head, they may proceed with the lesson. On the other hand, failure to nod will signal that the student has not understood the lesson and the teacher may need to clarify or explain further. “N” can also stand for ‘noting down and naming key information’ which enables students to retain the information and makes learning stronger.
Track the speaker: The attention span of every student is different. Tracking the speaker is a visual cue to be attentive. Students should be encouraged to track both the teacher and other students who are presenting in class. The conscious effort to track the speaker will help students to be attentive at all times and prevent them from getting lost or daydreaming in class.
Taken from Professional Learning Board.
Resources.
SLANT poster for the classroom [PDF]

SLANT
Outcome. I am in the early stages of trialing this technique with Year 7, 8 & 9 students. I have found ‘Track the speaker’ particularly useful as a cue for students to pay attention to whoever is speaking. At the time of writing it has taken a lot of hard work to embed the routine but I am beginning to see more students listening to instructions and positively engaging in class discussions. Other teachers in my department have also started to embed these commands and the initial feedback from them is positive. One restriction at the moment is that students are only exposed to the routine in my classroom for 50 minutes a week so they don’t get to practice as often as I’d like. This means I have to continually remind them, but I believe the effort I put in is worth the outcome.
Post submitted by:
Stephen O’Callaghan
#neverstoplearning
Feedback. Please let us know how ‘SLANT – Building habits in the classroom’ worked for you. Leave a comment on this post or tweet us at @nslhub.
#TMNSL – Micro presentation – ‘Learning Lunches’
#TMNSL – 5 minute micro presentation
As every school does we wanted to improve the quality of T&L and I am a firm believer in doing this through the sharing of good practice, as we have, and had, loads of great practitioners in school in lots of different departments. To share all of the ‘gems’ that everyone had in their toolkits we put together ‘Robert Blake’s Best Bits’ which is a collection of all the bits that make our teaching great. We asked every member of staff to contribute at least one idea that could be used generically by other staff in other subjects around the school, all of which were completed on a common format of a powerpoint slide. These were then collated, organised into different sections and shared with staff. Immediately we had helped create a culture where people were more open about sharing their teaching and helping others. The off-spring of this was we had more staff doing learning walks to see these gems in action in the classroom and T&L took on a greater priority with staff.
Resource. NSL TeachMeet presentation (PDF)
From this we wanted to further embed the culture of sharing T&L so we created the ‘Learning Lunches’ where every fortnight we would put on a buffet (£1.50 per head!) for teachers where 3 ideas from RBBB would be presented and explained. This led to a huge uptake in the ideas and the resultant conversations that were generated as a result of seeing the idea. Our SENCo then developed the idea for LSAs (as we couldn’t fit all staff in our food room where we have the Learning Lunches!) as they have a Learning Breakfast every fortnight, during PSHE lessons, to share their best practice.

Learning lunch at @RobertBlakeSC
The beauty of RBBB is that any one person can initiate and develop the idea. As a class teacher you can create your own ‘best bits’ then begin to share with other people, hopefully making the scheme whole-school. The Learning Lunches can happen informally without providing lunch for staff but putting on the buffet is hugely appreciated by staff who value the school’s commitment to developing T&L.
Post submitted by:
Greg Morrison
Deputy Headteacher
#neverstoplearning
Feedback. Please let us know how ‘Learning lunches’ worked for you. Leave a comment on this post or tweet us at @nslhub.
#TMNSL 20/03/2014 – Workshop resources: Differentiation
Differentiation by Chris Moyse (@ChrisMoyse)

Differentiation by Chris Moyse
Workshop Summary.
Our students differ from each other in so many ways:
· Prior knowledge and expertise
· Ability
· Language development
· Motivation
· Interest
· Family background and values
· How they learn best
· Where and when they learn best
· Speed at which they learn
· Levels of concentration
· Confidence and self esteem
· Physique
There are several ways by which we can make the learning more accessible for all our learners…
· Task
· Resource
· Outcome
· Questions
· Time
· Steps to take in an activity
· Support – peer/adult/virtual
· Grouping
· Pupil choice
· Curriculum
· Assessment & feedback
The top two sound too much like hard work for busy teachers so in this workshop we briefly looked at the possibilities of differentiating by choice.
Before though we considered the fact that John Hattie suggests that…
A teachers’ job is not to make work easy. It is to make it difficult.
He goes on to say that…
If you are not challenged, you do not make mistakes. If you do not make mistakes, feedback is useless.
Lev Vygotsky suggests that our students should operate within their ‘Zones of Proximal Development’. This involves facing challenges just beyond their current capabilities: a level of challenge that students can meet with help. Learning should feel tough, tricky, challenging, puzzling but not impossible.
To provide a challenging level of learning we need to know our students. Ensure that you have simple, understandable and usable pupil data available and use this data when planning and structuring teaching and learning in your classroom. Data together with any other relevant information about your students is best collated on an annotated seating plan or student profile. Have this annotated seating plan to hand and in the forefront of your mind as you prepare fabulous lessons. Remember to also have their recently marked books with you too as marking should always inform your lesson planning.
Start with the end in mind: plan for learning. Establish a clear objective and tangible outcomes avoiding the devil of low expectation – Must Should Could. Quite simply the wrong language to be using with teenagers!
Same task, different level of challenge. When you differentiate, you plan for the most able in terms of outcomes and then look at how to overcome the barriers for other groups in your class to enable them to access these outcomes – you then adapt resources, support and grouping to differentiate.
Research from Professor Robert Ornstein indicates that when learners feel as if they have some control and choice over the type of task that they are about to do, they feel positive and motivated.
So try to differentiate through choice eg Let the students choose their level of challenge or use workshops or drop in sessions: a series of inputs or demonstrations that students come to if, and only if, they need them
Differentiation top tips:
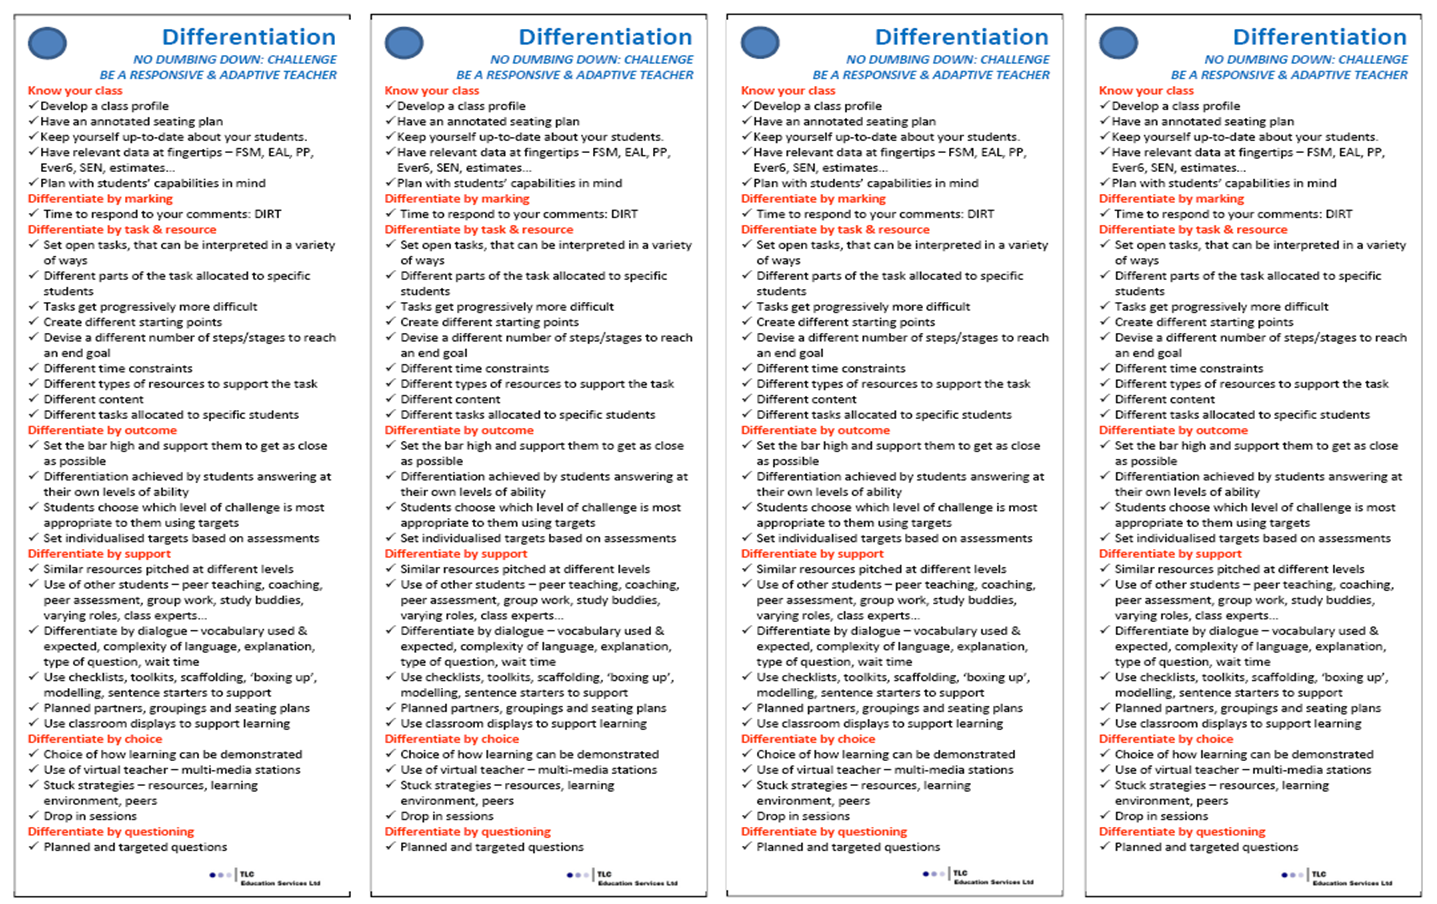
Differentiation bookmarks by Chris Moyse.
· Know your class and demonstrate this through annotated seating plans and student profiles. Use this ever-developing knowledge base to enable you to adapt your approach for who is in front of you.
· Challenge them. Have high expectations. Present learning without limits.
· Encourage your students to make and learn from mistakes. Then feedback can come into play.
· Opportunities for students to express their understanding and articulate their thoughts should be designed into any lesson. The more you hear and see the more you find out and the better you plan, respond and adapt to what happens during the lesson. Great teachers are great listeners too.
· Mark their books and provide your students with more work. Provide them with an opportunity to make your suggested improvements: the only time you will ever have 30 different lesson plans.
FREE RESOURCE: Differentiation bookmark.
@ChrisMoyse on Twitter.
#neverstoplearning
#NeverStopLearning by @DavidJesus
#TMNSL 20/03/2014 – Workshop resources: ‘Solo taxonomy’
Solo Taxonomy by Mat Pullen – @Mat6453
‘Solo Taxonomy’ by Mat Pullen.
Workshop Summary.
I have been thinking about SOLO taxonomy for a while and the impact it can have on student learning in PE. I have also looked at ways to make it easier for students to access.

Guide to Solo Taxonomy
I have previously blogged about Project Based Learning here and the feedback has been really positive. both staff and teachers are engaged in this approach to co construction of the curriculum and lots of teachers are telling me about their plans for embedding it in their schemes.
To move things on a bit I wanted to look at ways of supporting students to create their own learning models. To help facilitate the process of finding out what they need to improve on and where to find out how to do that.
That is where the link with SOLO comes in. I have used SOLO to great effect in practical sessions and students are really showing great progress in lessons and more importantly they kbow what they need to do to keep progressing.
In order to support this further I have created posters that I can use in sessions that allow the students to acces some visual cues to support them in their construction of lessons. The posters trigger augmented reality links to images and videos to help students check on technique and to assist in giving detailed feedback to each other.
The process is fairly simple, I created a poster on my iPad using Comic Life. Add this image to Layar.com in their creator section, add in video and images to the relevent sections and voila, augmented reality posters. The students can now access these with any device with the Layar app installed.
So now in a session, we start with students looking at a problem that they need to solve, they look at the skills they will need to develop to support them in overcoming the problem. Around the hall are posters with links to images and videos to help support their learning. They integrate numeracy to support their understanding of success, they use literacy to improve communication and feedback and they can see how they can progress using the SOLO stages.
This is a real change in lesson structure but really engages students to be active whilst learning a whole wealth of key transferable skills.
#neverstoplearning
#NeverStopLearning by @DavidJesus
#TMNSL 20/03/2014 – Workshop resources: ‘Great teachers’
Great teachers by Chris Hildrew – @chrishildrew

‘Great teachers’ by Chris Hildrew
Workshop Summary.
What makes an outstanding lesson? And who decides? Ofsted set out their criteria for evaluating the quality of teaching and learning in an institution as a whole. In their School Inspection Handbook, footnote 42, it says:
“These grade descriptors describe the quality of teaching in the school as a whole, taking account of evidence over time. While they include some characteristics of individual lessons, they are not designed to be used to judge individual lessons.”
We know that plenty of schools ignore this and adapt the criteria to apply them to individual lessons – for some very understandable reasons. We also know that this leads to teachers teaching “observation specials” to try and jump through the hoops of the taken-out-of- context criteria. You can read about the impact of this in @cazzypot’s blog: Is Michael Gove lying to us all? and in @BarryNSmith79’s Lesson Objectives, Good Practice, and What Really Matters.
Let’s start again.
A typical teacher’s directed time is 760 hours in a year. How many of those will be formally observed by someone else – three? Five? Ten? Whatever the number, there’s a lot of hours in a year when it’s just you and your learners in the room. Forget outstanding. Think about a great lesson you’ve taught – not a lesson where someone else was watching, but one of those lessons where it all worked. Where you and the kids left the room bathed in the warm glow of achievement. Where teaching felt really, really good. What were the ingredients? What made it work? And which of those features can you replicate in your classroom on Monday? If you were to start with a blank sheet of paper, how would you define a great lesson?
Think about:
• Structure
• Activities
• Behaviour
• Outcomes
And, if that’s a great lesson, what are the qualities of a great teacher? And how can we live them in the classroom for all 760 hours of the year?

Chris Hildrew delivered a workshop at #TMNSL on ‘Great teachers.’
#neverstoplearning
#NeverStopLearning by @DavidJesus
Begin with the end in mind.

Begin with the end in mind.
Assistant Principal
@DominiChoudhury
#neverstoplearning
‘Quick wins’ #9 – Developing oracy: Getting students to respond in full sentences.

Why? Students, due to apathy or due to the state school pandemic of not wanting to sound clever, often avoid giving a thorough explanation to reveal the depth of their learning; rather, given the chance, they will utter a barely audible ‘yes’ or ‘no’ and quickly retreat back into their protective shells. Sound familiar?
Possible solution. To combat this – a simple solution: have high expectations of students’ oracy so that they respond in full sentences.
a) To achieve this, get students to rephrase your question as part of their answer.
For example: Why does Dickens open his novel, Bleak House, with pathetic fallacy?
Student answer: Dickens opens his novel, Bleak House, with pathetic fallacy because…
b) When posing an open-ended question, provide an oral scaffold to extend students’ thinking.
Resources.
An example slide scaffolding oracy.

Example oracy scaffold.
Outcome. Having high expectations around students’ oracy has resulted in students providing in-depth feedback as opposed to giving one word answers. In English, levels can also be attached to the quality of student responses: level 5 is linked with being able to explain your ideas; level 6 requires students to explore ideas, thereby showing that information can be interpreted in different ways. As a result, students have evolved to see the value and importance of talk in a lesson – no longer is it an opportunity to doze off or give a mere one word answer, which had previously given them the impression that they were making a meaningful contribution to the lesson – but, by giving extended answers, students now realise that this is an integral part to the lesson. It has also helped to bridge the gap between the talking and writing stage of the lesson. Students recognise that if they can articulate their ideas verbally, this also helps them to translate their ideas to the page.
Post submitted by:
Steve Gill
English Teacher
#neverstoplearning
Feedback. Please let us know how ‘Developing oracy: Getting students to respond in full sentences’ worked for you. Leave a comment on this post or tweet us at @nslhub.
‘Quick wins’ #8 – Differentiated question cards

Differentiated question cards.
Why? To ensure that students are aware of the key questions that need to be asked and answered in a learning topic, and that pre-planned questions are appropriately pitched to the right students in a very mixed ability class (grades A through to E at A-level). Also, when questions are chosen carefully to have an appropriate level of challenge for each ability, this resource makes it easy to demonstrate the progress students make within the lesson.
Possible solution. As they walk into the lesson, provide each student with a slip of brightly coloured card with their key question on it and some space to write their answer on the card later on. Questions which are more open to interpretation can be repeated with different students. Students should keep their question card on their desk in front of them throughout the lesson as a visible reminder of the key question that they are seeking an answer for. Either use these questions punctuated throughout the lesson to draw students attention to what they have learnt so far after each activity, or use as a plenary at the end of the lesson.
Resources.
A set of pre-planned and differentiated questions, a couple of pieces of coloured card.
Outcome. The key questions keep students intently focused throughout the lesson seeking the answer to their question. Student responses to these questions, and further questioning that develops from their responses, enables the teacher to demonstrate the progress made within the lesson. Pre-planned questions which are more open to interpretation enable the teacher to ‘basketball’ the questioning to develop a depth of response from a range of students.
Post submitted by:
Domini Choudhury
Assistant Principal
#neverstoplearning
Feedback. Please let us know how ‘differentiated question cards’ worked for you. Leave a comment on this post or tweet us at @nslhub.
