
Tagged: Quick wins
Blog of the week | 29th November 2015
This weeks blogs of the week look at challenge and how this can be achieved in various different ways across the curriculum. Both posts nicely summarise what is meant by challenge and ‘challenging work.’ They also provide a number of strategies to use in the classroom tomorrow.
- Challenge – success for all: https://classteaching.wordpress.com/2014/02/27/challenge-success-for-all/
- Great lessons number 3 – Challenge: http://headguruteacher.com/2013/01/31/great-lessons-3-challenge/
#neverstoplearning
A collection of posts for NQTs.

Dylan Wiliam
I wanted to write a definitive post for NQTs but was struck by how many useful posts already exist. Instead of repeating what others have already written, this post will serve to index some great advice from some remarkable people. The is predominately for new teachers but will also serve as a timely reminder to all teachers at any stage in their careers.
- It is completely normal | Sue Cowley | @Sue_Cowley | Blog
- ‘Crowd wisdom for NQTs’ iBook | Rachel Jones | @rlj1981 | Blog
- A letter to my NQT self | Chris Hildrew | @chrishildrew | Blog
- Contemporary educational ideas all my staff should know about | Tom Sherrington | @headguruteacher | Blog
- The pedagogy postcards series | Tom Sherrington | @headguruteacher | Blog
- This much I know about why all of us must improve our teaching | John Tomsett | @JohnTomsett | Blog
- Back to school series | David Didau | @LearningSpy | Blog
- Some quick tips for NQTs and Trainees | @OldAndrewUK | Blog
- What I wish I knew then | Mark Anderson | @ICTEvangelist | Blog
#neverstoplearning
#TMNSL 20/03/2014 – Workshop resources: Stop doing I.T. wrong!
Stop doing I.T. wrong! by David Morgan (@lessonhacker)

Stop doing I.T. wrong by David Morgan.
Workshop summary.
Digital learning is not something to be scared of or to be worried about.
It’s just learning.
No one called it ‘Pen based learning’ when we moved away from slate tablets, but I’m sure there were a few people reluctant to change their ways, or that didn’t quite ‘get’ the point of pens. In any case, digital learning is here to stay and should be a part of every lesson in some form, if only because it saves you time!

@lessonhacker
If you’re interested in finding out more then head to my blog [http://www.lessonhacker.com/] or read my book, which coincidentally has the same title as my workshop [http://www.stopgettingitwrong.com/] .
Buy David’s book – Stop doing I.T. wrong!
@LessonHacker on Twitter.
#neverstoplearning

#NeverStopLearning by @DavidJesus
‘Quick wins’ #16 – SLANT – Building habits in the classroom.
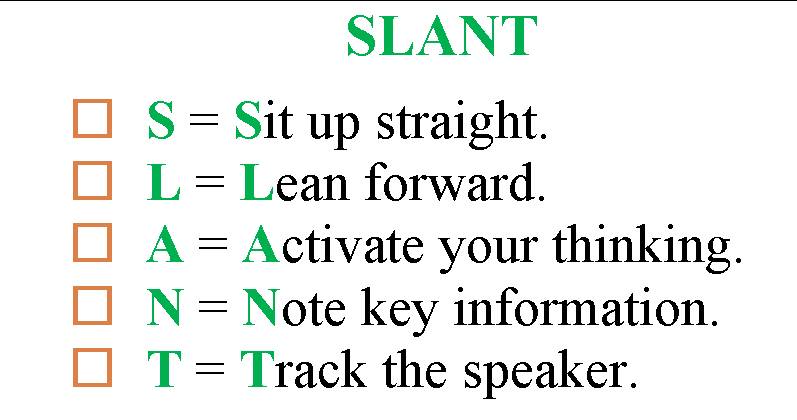
Image via http://olms1.cte.jhu.edu/29618
Why? I’ve struggled to get 100% attention from students 100% of the time. Quite often when I instruct students I’ll use the “3,2,12 technique to get students attention, which works well. But I then struggle to retain attention. This is made especially difficult when teaching in a Computing room – the lure of the computer screen can be too much for students. A typical instruction will have to be halted within seconds to address students who’s eyes have wondered back to their computer screen.
Possible solution. I needed a routine to retain student attention. I started my research by looking at Doug Lemov’s excellent collection of videos for his ‘Teach like a Champion’ book. I came across the video below.
It was during the video I saw a poster on the wall of one of the classrooms with the word ‘SLANT.’ Further investigation led me to discover the meaning of this term. SLANT is a strategy used to get students to pay attention not only when the teacher is talking but also when a student contributes to a discussion. An overview of the strategy can be found below…
Sit up: What is the right posture to sit in the classroom? Is it to rest your head on your hands, sit slouched in your seat or put your head down on the table? These are all positions that will put students to sleep. In order to develop attentive listeners, it is essential to encourage students to sit up straight with their back against the seat, feet placed firmly on the ground and hands on the table. This is the optimal position to ensure good learning and processing of information.
Lean forward: Another position that is critical to promote active listening is leaning forward. Students should be taught to lean forward during a lesson. It may also help teachers understand the interest level of the class and fine tune their presentation to make it more interesting for the students.
Ask and answer questions: This component can liven up the classroom and encourage students to be active in their learning process. Encourage them to clarify their doubts, answer questions, and discuss or debate on ideas. These question and answer sessions can help activate their thinking, encourage critical analysis of the content and strengthen their understanding of the lesson.
Nod your head: Nodding one’s head is a form of nonverbal communication to indicate that the lesson has been understood. When a teacher observes a student nodding his/her head, they may proceed with the lesson. On the other hand, failure to nod will signal that the student has not understood the lesson and the teacher may need to clarify or explain further. “N” can also stand for ‘noting down and naming key information’ which enables students to retain the information and makes learning stronger.
Track the speaker: The attention span of every student is different. Tracking the speaker is a visual cue to be attentive. Students should be encouraged to track both the teacher and other students who are presenting in class. The conscious effort to track the speaker will help students to be attentive at all times and prevent them from getting lost or daydreaming in class.
Taken from Professional Learning Board.
Resources.
SLANT poster for the classroom [PDF]

SLANT
Outcome. I am in the early stages of trialing this technique with Year 7, 8 & 9 students. I have found ‘Track the speaker’ particularly useful as a cue for students to pay attention to whoever is speaking. At the time of writing it has taken a lot of hard work to embed the routine but I am beginning to see more students listening to instructions and positively engaging in class discussions. Other teachers in my department have also started to embed these commands and the initial feedback from them is positive. One restriction at the moment is that students are only exposed to the routine in my classroom for 50 minutes a week so they don’t get to practice as often as I’d like. This means I have to continually remind them, but I believe the effort I put in is worth the outcome.
Post submitted by:
Stephen O’Callaghan
#neverstoplearning
Feedback. Please let us know how ‘SLANT – Building habits in the classroom’ worked for you. Leave a comment on this post or tweet us at @nslhub.
‘Quick wins’ #15 – Getting students to articulate their learning.

Getting students to articulate their learning by Steve Gill.
Why? I guess I was never really convinced by the idea of getting students to articulate their learning; I thought it was one of those tokenistic additions to lessons, something that would please the observer rather than having an impact on students’ learning. So, when students were clearly making progress through their written work, I was little concerned if they couldn’t express precisely what they were learning, verbatim, like they had regurgitated every word of the specification. I was also very cautious of time that this took; I feared it would slow down the pace of the lesson, that I would lose the students before I had a chance to engage them. I was wrong…
Possible solution. I now think that getting students to precisely articulate their learning is integral to their engagement and to their progress. So, what changed? Persistence and developing habits. Just like Einstein said,
We are what we repeatedly do. Excellence, then, is not an act, but a habit.
Although I had always shared the lesson outcomes with students, their interaction with them was something that I tried to build on, every lesson; before, I had just assumed that reading the objectives to students was enough. However, David Didau’s book, The Perfect English Lesson, was something which helped me to question this process. He talks about getting students to interact with the lesson objective in creative ways – getting them to guess missing words; to write the lesson objective as a facebook status and then allowing students to comment on this. Therefore, I took inspiration from this.
Firstly, I started with the language in the outcomes of the objective. I stripped the specification down, picking out the key words. For a reading lesson in English this usually translates to getting students to explain, explore, analyse language or ideas. Through questioning, I then got students to define – precisely – what these words meant. To help with this I added pictures beneath my outcomes and I asked students to match up the correct pictures to the outcomes. This led to an increased sense of clarity. For example, students were able to link the picture of an explorer surveying a landscape to the need to look everywhere in a text; to find more than one quotation to support a point; to look at more than one interpretation when looking at a quotation. Discussion evolved further to looking at sentence starters which would help students to demonstrate that they were explaining or exploring an idea.
Resources.
Example learning objectives (editable).
Outcome. This strategy has worked successfully. Students are now clearly able to say what they are learning in a lesson and they can also precisely say what level they are working at, as well as being able to articulate how to move to the next level. This has motivated students: their next learning milestones have shrunk, becoming tangible, and within their reach. Also, with a new emphasis on lesson grades being linked to ‘progress over time’, students’ ability to articulate what they have learnt and how they have progressed is more paramount than ever. In a recent observation it was great to see students explaining to the observer what they had learnt and how they could progress further. However, I don’t think this has solely been achieved by getting students to interact with the lesson objectives and outcomes alone; the language used in the objectives has permeated all aspects of learning. I have used it repeatedly through questioning and book marking, too. In this respect, it has also sped up the latter as, in some cases, I am able to write ‘explain your point’ or ‘analyse these words.’ In short, having high expectations around students being able to articulate their learning has led to significant improvements in my classroom. So, if you are worried about this absorbing too much lesson time, fear not: just persist. And slowly, students will possess a clear understanding of what they need to learn, and know exactly how to get there.
Post submitted by:
Steve Gill
#neverstoplearning
Feedback. Please let us know how ‘Getting students to articulate their learning’ worked for you. Leave a comment on this post or tweet us at @nslhub.
‘Quick wins’ #14 – Walking dictation – Team work, communication and accuracy.

Image from @gapingvoid – http://gapingvoid.com/
Why? Proof reading – self assessment. I am forever correcting the same mistakes which arise from a lack of proof reading. As soon as I question a student they know how to correct their work, but they don’t seem to do it!
Possible solution. Walking dictation. Students work in group of three – one student is the scribe and the other two are runners. Differentiated texts, images or sound files are placed across the classroom from where the groups are based.
One runner from each group at a time ‘walks’ to their allocated text, reads part of it and returns back to the group where they dictate to the scribe what they read. The other runner hears how far their team mate read and goes up to the text to read and then return to relay the next part of the text to the team. The scribe is using listening and writing skills and the runners are using listening, reading and speaking skills.
All members are working on their communication and team work skills.
What’s the carrot? Well there has to be a success criteria and I use the least amount of points win. Winners win one point, second place two etc. However, points are incurred for misspelt words, or indeed missed words.
Resources.
Walking Dictation – How to – editable
Outcome. Challenge and drive for accuracy. It is an engaging task where students realise the importance of accuracy and to check over their work to eliminate avoidable errors.
Post submitted by:
Becky Thielen
Head of MFL
#neverstoplearning
Feedback. Please let us know how ‘Walking dictation’ worked for you. Leave a comment on this post or tweet us at @nslhub.
‘Quick wins’ #13 – How to mail merge student test results into feedback sheets
Why? We wanted an efficient way to communicate the students strengths and weaknesses to students based on their most recent mock. We saw the value in a question by question breakdown but it seemed time consuming.
Possible solution. We made a feedback sheet that had space for a question by question breakdown and comment on where to revise. We then used a mail merge to drop individual results into the sheets.
Resources.
Outcome. The students said the detailed feedback really helped them focus their revision. Allowing them to work on the topics they needed to instead of succumbing to the temptation to just practise what they were already good at.
Post submitted by:
Vyki Shaw
Head of Maths
#neverstoplearning
Feedback. Please let us know how ‘mail merging student test results into feedback sheets’ worked for you. Leave a comment on this post or tweet us at @nslhub.
‘Quick wins’ #12 – Quick & simple student voice.
Why? The class is quiet. Students are getting on with work. But how do they feel about the lesson? Are they learning? Are they enjoying their learning? School is an extremely busy place the opportunity to reflect on this sometimes passes us by. I needed a quick way to answer these questions as it’s not always obvious to see. Paper surveys collected the information but were to time consuming to analyse. I needed something that required almost no prior planning and yielded immediate results.
Possible solution. A simple scatter graph. Label the axis however you see fit and invite small groups of students to plot their response.
Resources. This can be easily adapted to measure almost anything.

Quick feedback from students. Simple to set up and easy to analyse.
Outcome. I was able to gage student responses quickly and use that as a basis to ask more probing questions. Obviously this is just a snap shot, but valuable none the less in future planning and empowering students through student voice.
Post submitted by:
@Artedu_KHeath & @MrOCallaghanEDU
#neverstoplearning
Feedback. Please let us know how ‘Quick & simple student voice’ worked for you. Leave a comment on this post or tweet us at @nslhub.
‘Quick wins’ #11 – Tracking progress over time.

Multiple assessment sheets seemed like a good idea… Image by @gapingvoid
Why? In Art & Design we mark students coursework & exam projects numerous times before the final marks are submit at the end of the course. I found that students would occasionally lose the odd feedback sheet & sometimes even the assessment booklets I provided.
Possible solution. To make certain we have a clear record of progression in sketchbooks, I adapted an assessment worksheet I saw at Redland Green Art Department for our GCSE & A-Level classes. It is just one A3 assessment sheet which clearly shows the progression students make over time in each of the assessment objectives. Every time work is marked, I do it in a different colour pen and pupils can see their work gaining more marks as they redraft & build up their projects.
GCSE Marking Progress Sheet (editable) – Easily adapted for any subject!

Shrinking the change – removing clutter and focusing on what’s really important.
Outcome. Pupils & teachers can see clearly see on one page (which is stuck into sketchbooks) where they are making progress and the areas in which they need to improve.
Kate Heath
Art Teacher / Artist / Leader
#neverstoplearning
Feedback. Please let us know how ‘Tracking progress over time’ worked for you. Leave a comment on this post or tweet us at @nslhub.
‘Quick wins’ #8 – Differentiated question cards

Differentiated question cards.
Why? To ensure that students are aware of the key questions that need to be asked and answered in a learning topic, and that pre-planned questions are appropriately pitched to the right students in a very mixed ability class (grades A through to E at A-level). Also, when questions are chosen carefully to have an appropriate level of challenge for each ability, this resource makes it easy to demonstrate the progress students make within the lesson.
Possible solution. As they walk into the lesson, provide each student with a slip of brightly coloured card with their key question on it and some space to write their answer on the card later on. Questions which are more open to interpretation can be repeated with different students. Students should keep their question card on their desk in front of them throughout the lesson as a visible reminder of the key question that they are seeking an answer for. Either use these questions punctuated throughout the lesson to draw students attention to what they have learnt so far after each activity, or use as a plenary at the end of the lesson.
Resources.
A set of pre-planned and differentiated questions, a couple of pieces of coloured card.
Outcome. The key questions keep students intently focused throughout the lesson seeking the answer to their question. Student responses to these questions, and further questioning that develops from their responses, enables the teacher to demonstrate the progress made within the lesson. Pre-planned questions which are more open to interpretation enable the teacher to ‘basketball’ the questioning to develop a depth of response from a range of students.
Post submitted by:
Domini Choudhury
Assistant Principal
#neverstoplearning
Feedback. Please let us know how ‘differentiated question cards’ worked for you. Leave a comment on this post or tweet us at @nslhub.
